Andy Lalaguna Photography
Just another WordPress.com site
The Brenizer Method – an awakening
I stumbled across this looking for something else, and it caught my attention. I will paraphrase the method below, but would strongly recommend that you investigate over the internet; there are plenty of instructions out there that will get you in the ball park. (here, here and here for starters…)
So what is the Brenizer Method:
It a mechanism of producing the benefits of an image with a very narrow depth of field, and extending that focal plane across a larger area. It gives you a tilt and shift effect with a band of in focus detail across the finished frame.
It also delivers a medium to large format level of quality from a much smaller CCD size… if all the pieces fall into place. This is the key issue here, everything has to fall into the right place for it all to work; Lighting, Subject, Processing and final finishing… This complexity provides both its infuriating frustration and satisfaction in equal amounts.
So, to paraphrase, you take a very narrow depth of field image of you key subject to capture that subject with as much of the frame as possible, if it’s a portrait, then it would be just the face. This image could stand up on its own (file that one away)… then keeping all the settings on the camera identical you move around this key image in an ever expanding spiral ensuring you have a moderate amount of overlap in each capture. Note: with identical settings to the original capture; white balance, focal length, focus, ISO, shutter speed, etc. These images should be identical in exposure to the first key image.
Now you can complete your processing of your images, in two stages. First stage finish your images with the profiles/recipes to your taste, make sure that all images are processed exactly the same way, so tonally, and exposure wise all the images are identical. Second stage is to stitch these images together, as a panoramic stitch.
Here is another interesting aspect of this technique, what do you use to stitch these captures together. I had tried quite a few, and that is a story for another day. If you are already a Photoshop user, then that works well. I wanted something a little less complex… A number of experimenters with this method suggested Hugin. Unfortunately, being fairly impatient, I found this equally frustrating… Not wishing to add to my existing frustration, I continued looking. I found a tool from Microsoft Research, Image Composition Editor, another free download that just did panoramic stitching. It does basic blending of the exposure values (which you have already worked studiously to stabilise). This gets you to the point where you can decide whether to invest in a more complex tool, or not.
What sort of subjects does this method suit, many subjects from portraits to landscape, and everything in-between… As you may, or may not know, my morbid fascination is portraits… so to stretch/distract myself, I started with landscape details. It does give a very different effect, and encourages you to construct an image, rather than take one. It allows you a level of detail that will permeate the image, and a path that draws the eye through an image (not what I was expecting). Now that I have a basic grasp on this method, I have a strong curiosity to explore it with people, figures and faces…
Please find below some samples of mine taken whilst growing into this method.

Experiment #2 – Copyright 2012 – All Rights Reserved – Andy Lalaguna

Experiment #3 – Copyright 2012 – All Rights Reserved – Andy Lalaguna
These are compressed images, at approximately 20% of their original size. One of my attempts, came in at 300Mb for a JPG… be aware, that your platform doing the processing/stitching of the raw images my have its work cut out to achieve the output…
PS. All that being said, get out there and shoot.
Another Revelation (for me at least) – The Zone System
There are a number of givens, certainly within the Photography world, that are supposed to lead. They end up confusing and confounding most beginners. Don’t allow this frustration to get to you, or divert you from your fascination. You want to take pictures, you want to make a record, it makes you happy, and with the world becoming a smaller place, it will likely make an audience happy too.
Do your homework, research, experiment, explore, review and reach conclusions… (don’t let this confusion distract you)
One of the many sources of information out there is CreativeLive, a spectacularly awesome education framework. I use it a lot. I only wish that they had this around when I was at school and college; things may have been considerably different now.
I had the pleasure of enjoying a certain young gentleman called Don Giannatti (@Wizwow) deliver at CreativeLive recently. I enjoyed the broadcast so much I bought the download… Don turned on a light for me, and made a coin drop. Allow me to wind back a little while.
There are a number of items here which to me appeared disjointed. Sure they were all to do with photography, I just didn’t get where they were supposed to go, how they meshed together, how the sequence went. They were simply floating around waiting for a home…
Zack Arias, another presenter on Creative Live (at least that is how I got to know him), started with setting what the camera thinks is the right exposure, by setting the exposure for your subjects cheek. Got that, I can work with that one, on its own. This doesn’t need anything else to work. Set my Depth of Field where I want it to be, get the exposure right for the subjects cheek, and go at it… got some nice results too… encouraged me to explore further… It’s a little simplistic, but it gets results. It creates a degree of satisfaction, and drives you forward. After all I picked up a camera because I wanted to take pictures.
This soon became the desire to make pictures, and will likely progress to creating pictures soon enough…
Phil Malpas, and David Präkel, with their books talking about Capturing Colour, Composition and Exposure, in the Basics Photography series mention the Zone System by Ansel Adams, and Fred Archer.
The Zone System talks about making sure that your light and dark values render as well as they can, in relation to the available light, the medium which you are exposing and all the little bits and pieces that come together to make the image. Challenges here are many…
- The picture that you have visualised, the one that is in your mind’s eye.
- The picture that is sat in front of you captivating you to want to operate the shutter.
- The picture that your camera can see.
- The picture that the medium you are exposing can actually capture…
- The picture that you can work with in post, and subsequently print to enjoy at your leisure (so that you can then communicate that to a wider audience).
As you can see these are all challenges, and all floating around in my head waiting to find a slot in a sequence to call home.
This is where Don makes the coin drop, and turns the light on. I was doing fine with Zack’s advice and turning out acceptable images. A nice logical progression from where I was previously… The Don drops the coin, and turns on the light… Expose for the cheek (check – heard that somewhere before, listening hard now) it’s a nice mid tone, a middle grey (heard this before, another coin drops (18% grey card), trying to listen even harder now over my deafening heart beat), a zone 5 (POW! Shebang! ZAP!). I am sure I can hear angels singing…
All these seemingly disparate items all drop into place. A nice orderly sequence, a framework… A series of checks and balances, of give and takes… the negotiation of the vision to create the image.
So, let’s put this in my sort of order. I want a portrait; it’s all I ever wanted.
Expose for the cheek. (My camera is a little ‘hot’ sometimes, so I sometimes drop a third or a couple of thirds) But using the camera meter, I take a reading through the lens.
Now I know why I am doing that, so that the focus of the interest in the image is exposed correctly, and my composition should draw your view into the area of highest contrast. The rest of the image should fade into the background, holding your focus where I have directed you to look. To the eyes, to the profile, to the detail, whatever it is…
The trick here is, to retain a level of useable detail in some, or all, of the rest of the composition; an understanding of the zone system allows you to concentrate on the contents of the whole frame not just the small section that you have your meter focussed on. You are building a complete image, a vision that will draw the gaze in, and hold it there. A great image will offer something new every time that you look at it. You may already have some of these images, either your own, or someone else’s, that bring you back again and again. These images will accomplish this through their management of the Zone System, through composition, through texture, through emotion, etc…
Take aways:
- Get to grips understanding your kit, to take better pictures, more often.
- Meter what you are taking, get to recognise what the tones are, drive it, don’t be driven by it…
PS. This all being said, get out there and create images…
A Double Light Lo-Key Portrait
The target of this self assignment, was to create a double light portrait with a Lo-Key feel to it. This follows on from last weeks post and activities with a single light to start getting a little more creative. Same rules apply; lets use the minimum portable equipment as possible. Lets use this opportunity to gain more experience using the Speedlights.
This is the equipment used… Two Speedlights, Three Pocketwizard radio triggers, bedsheet.
We are going to do this on location, at the local photography meetup club (EPyC), in a cafe, with an average audience of about 50 people. For props we have a bedsheet again, all we need now is another willing victim volunteer…
We started with the following image for inspiration, an image from the extremely artistic photographer, Patricio Suarez (known as Patofoto on Flickr). He created this image below, absolutely mesmerizing…

Copyright 2012 - All Rights Reserved - Patricio Suarez
Let me introduce you to the fantastic Ajay Goel, a fellow photographer, and our model for this evenings efforts.

Copyright 2012 - All Rights Reserved - Andy Lalaguna
Positioning, following the layout from the previous two posts, if Ajay is sitting at the centre of the clock; the key light is at a quarter past four, whilst I am at six o’clock, and the rear Speedlight is at approximately at twelve o’clock directly inline with myself and Ajay. The Key light is being held by a voice activated light stand, and bounced off the bedsheet which is on the floor in front of Ajay. The rear speedlight is sat on the floor, pointing away from Ajay, at the window blind behind him. This puts us in the ballpark, as you can see from the image above, the background isn’t completely blown out, but we are close enough for minor tweaks to get the image…
- A simple double light portrait, using very few props, and a portable Speedlight driven setup.
This all being said, stop reading, and get out there and create images…
A Double Light Hi-Key Portrait
The target of this self assignment, was to create a double light portrait with a Hi-Key feel to it. This follows on from last weeks post and activities with a single light to start getting a little more creative. Same rules apply; lets use the minimum portable equipment as possible. Lets use this opportunity to gain more experience using the Speedlight softboxes.
This is the equipment used… Manfrotto background stand kit, two Manfrotto light stands, Westcott Apollo 28″ and 50″ soft boxes. Speedlights, radio shields and Pocketwizard radio triggers.
We completed this on location, at the local photography meetup club (EPyC), in a cafe, with an average audience of about 50 people. For props we had a bedsheet and some white netting, all we needed was another willing volunteer… So one of the EPyC management team, volunteered a new joiner… Amel.
We started with the following image for inspiration, an expression from the extremely talented and capable photographer and instructor, Joe McNally. He created this image as a result of meeting this extremely talented dancer. The first thought that came into his head on meeting her was to cover her in paint, wrap her in mesh and illuminate her with a softbox… He did this in the context of a training class for Scott Kelby. If you haven’t read Joe’s Blog, please do yourself a favour, and get stuck in, it is spectacular, and for someone who doesn’t ‘write’, it is thoroughly engaging…

Copyright 2012 - All Rights Reserved - Joe McNally
Let me introduce you to the lovely Amel, unassuming, discrete, polite… absolutely amazing eyes… our model for this evenings efforts.

Copyright 2012 - All Rights Reserved - Andy Lalaguna
We have a 28″ Westcott Apollo Softbox to illuminate Amel from in front and above, and a Speedlight firing on wide, through a diffuser, then through the bedsheet directly behind, and pointing at, Amel’s head… I am squeezed in between the lower edge of the Softbox, and the light stand, and Amel is gazing right into the lens, and through the back of the CCD. With a white blouse on, and all that white netting, there is enough bounce to provide sufficient fill (happy coincident)…
Positioning, following the layout from the last post, if Amel is standing at the centre of the clock; the softbox is at a quarter past six, as am I, and the rear Speedlight is at approximately a quarter past twelve o’clock directly inline with myself and Amel. This puts us in the ballpark, as you can see from the image above, the background isn’t completely blown out, but we are close enough for minor tweaks to get the image…
As an aside, one of the things that we do here, is similar to others. We set the camera up in tethered mode, so that we can broadcast the output onto a larger screen so that the audience can see what is going on. We currently use a 3m USB cable to connect the camera to the laptop, and the laptop is connected to a projector, and a projector screen. The image above, was one of 23 frames, and we were done in about three and half minutes. This is beginners luck (I am convinced…), but what it proves for me that with sufficient planning and preparation, something magical can happen without worrying about all the technical details (as these are already taken care of)… the main reason that Zack Arias and a lot of others keep saying get to know your hardware, practice, practice, practice… and then practice some more.
- A simple double light portrait, using very few props, and a portable Speedlight driven setup.
This all being said, stop reading, and get out there and create images…
A Classical Single Light Portrait
The target of this self assignment, was to create a single light portrait with a classical feel to it. This is based on a question asked in a previous meeting, what is a Rembrandt image…? So let’s go ahead and create a Rembrandt’esque image. Lets use the minimum portable equipment as possible. Lets use this opportunity to gain more experience using the Speedlight softboxes.
This is the equipment used… Manfrotto background stand kit, two Manfrotto light stands, Westcott Apollo 28″ and 50″ soft boxes. Speedlights, radio shields and Pocketwizard radio triggers.
We are going to do this on location, at the local photography meetup club (EPyC), in a cafe, with an average audience of about 50 people. For props we have a black velvet back drop and a cafe chair, all we need now is another willing volunteer… And when one of those wasn’t available, we cajoled an unwilling one…
Let me introduce you to the lovely Hana, who still doesn’t believe me… absolutely gorgeous…
We sat Hana in the chair and with me at about 6:30, with Hana at the centre of the clock face, facing to 8:30, but looking towards me, we set the 28″ softbox at about 9:00. She is in line with the trailing edge of the softbox, to get some light wrap on her face. The black velvet backdrop filled the frame behind Hana.

Hana, with her game face on.
So we are in the ballpark, close enough. The light covers Hana well enough to give a richness and depth. And delivers a nice comfortable, simple portrait. Hana, as you can see it doesn’t hurt to be in front of the camera?
So now that we are where we need to be, or close enough… Let’s push the boundary a little more, after all we wanted a more classical look to the portrait. We have the lighting and camera in the right combination…
So who else produced iconic images during Rembrandt’s time…? How about a fellow baroque artist of the period; Johannes Vermeer..

Johannes Vermeer - The Girl With the Pearl Earing
Again, a single light source image, a window in his studio, an uncomplicated background focussing on the subject a young girl in, for the period, the latest fashion… If we mix these two images together, we get the following…

EPyC - Single Light Portrait - Our Maureen with the Pearl Earing
Here we have the equally lovely Maureen, a slightly more willing volunteer with the meetup’s attempt at the girl with the pearl earing. Quite an interesting comparison when you place these two images together, and an interesting commentary.
Nothing has changed between our first photo and the last, except the subject. Lights and camera are basically in the same place. We played with the 28″ and the 50″, but preferred the look of the 28″ softbox on both subjects.
A simple single light portrait, using very few props, and a portable Speedlight driven setup.
This all being said, stop reading, and get out there and create images…
My Grip Bags
Grip, a frightening topic…
Loads of bulky stuff, conflicts with the fact that I want to be as portable as possible. Mutually exclusive you might say. Certainly a challenge…
Let me start with what I am trying to achieve here. I functionally want a simple setup that I can carry around with me. A couple of light stands, something to hold up a backdrop, a tripod and a monopod. Then there are the associated clips, and portable modifiers.
Light Stands
I use the Manfrotto 1052BAC light stands mainly because they clip together into a single unit, and with their very large tripod bag, you can get 5 of these Light Stands in there (I currently have 4). Two are dedicated lightstands, and two, with the cross bar, form the backdrop holder…
Modifiers are a couple of shoot through collapsible scrims, a couple of soft boxes (one medium, one large), the backdrops themselves; a large piece of black velvet and a bed sheet (doubles as an even larger soft box).
Clamps are an assortment of crocodile clips, and ‘A’ spring clamps.
So far, I have managed to squeeze this down to two large tripod bags, and a recycled jute greenwash bag… And carrier bags for the assorted props…
Reasonably portable…
PS. This all being said, get out there and create images…
My Camera Bag
I now use a ThinkTank bag, a Restrospective 20. I had been previously a heavy user of LowePro bags, and started with one of their camera bags, not bad kit, served me well in the past. As I outgrew this bag, I tried Kata bags, and although I could now get all of my growing kit into it, it was quite uncomfortable to carry around (Lowe beats Kata hands down here).
Why did I move to ThinkTank, mainly because it didn’t look like a camera bag, so slightly less obvious. The reviews were favourable, so I took a chance. I can now carry the majority of the kit I need in one bag, with a reasonable degree of comfort.
So what do I have in my bag?
- Camera, with battery foot and single lens.
- PocketWizard TT5 radio triggers x 3
- PocketWizard AC-3
- Speedlights x 2
- A full set of Gels, and Peter Honl Speedstraps
- A Peter Honl Speedlight Grid
- Charger and power cable for the camera batteries
- Lastolite Collapsible White Balance card
- Moleskin notebook (love the way these feel in your hand)
- Spare Eye Cup
- Spare charged camera battery
- 2 x pens
- 1 Tb hard drive and USB cable
- Remote cable trigger
- IR remote trigger
- BlackRapid Strap
- Lens cloth and pen
- Phottix speedlight dome diffuser x 1
- Sometimes, I also carry my spare rechargeable batteries as well – (12 x 2450mha) in a battery caddy.
This is quite a lot of gear when you lay it all out, but the Retrospective 20 swallows this all up with ease. As a result I am now a convert… I would strongly recommend the ThinkTank for serious consideration. Please review very carefully how you plan to use the bag, and what you need to carry… And judge accordingly… (that is beginning to sound quite sensible in my old age…)
Now when I need to travel really light I have been using these camera slings. I started with a sunslinger, but that would not handle the weight of my camera, it’s battery foot, and fast glass… The shock absorber simply went limp, and the strap just started to wear heavily… Then I tried a BlackRapid RS-7. Now this was a little more substantial. My only annoyance was that the strap at the rear would allow the pad to wander, which became quite distracting… But the wear rates were impressive (the camera was on me most of the time)…
I bumped into Kurt Peterson, (one of the senior management team at BlackRapid) at GPP 2012 and congratulated him on such a great product. The benefits still far outweighed the annoyances… And recounted my tale above. Kurt is a consummate professional and allowed me to vent… When we finished he recommended that I try an RS-Sport strap, and I must admit he was absolutely right, I hadn’t noticed previously, but when leaning forward with the old strap, I would instinctively reach back to catch the camera as gravity pulled it round. Not so with the RS-Sport strap. Camera stays where it is… My hand still moves round to catch something that isn’t there, old habits die hard… Kurt is an absolute star, and a genuinely nice guy, if you get the chance, introduce yourself, you will be better for it…
The strap simply does what it is designed to do, comfortably and without any fuss… Another simple device, simple in design and concept, perfectly executed. Now the female club members would really like a female cut strap on the RS-Sport please…? Is this likely to appear on the horizon?
Battery caddy, if you go completely portable you are at the mercy of the dreaded batteries… Plenty of articles out there regarding the care and choice of batteries, I am not going to go there. What I will say is how you carry the batteries, which few people touch on… Batteries if shorted will discharge themselves… A 1.5v AA battery can start a fire… You need to take care of how you transport these items, very good care… I am using the power cell battery caddies designed for air crew by PowerPax. Simple firm polythene cages that protect the batteries whilst storing them. They come is quite a few colours and sizes. I try to stick to just AA size, and I have a 12 battery caddy. Another very tidy designed item that does its job with little fuss… Another happy camper… Job well done…
Update:
I have now received a ThinkTank Airport International V2.0 as a gift, as my travel plans are now more flight, than foot, based. I cannot recommend this company highly enough. Photographers bags designed by photographers for photographers. The experience was flawless and painless. Even the wheels roll as smoothly as silk… an absolute joy to use… Strongly recommended…
My Softbox Setup
Following on from the Zen of Hardware, how do I setup my equipment.
I use Westcott Apollo softboxes, primarily because they are designed to work with speedlights. This makes me a little more flexible, and more mobile.
I currently use their 28″ and a 50″ collapsible Softboxes. These need an umbrella mount to attach them to a light stand. I use the Manfrotto 1052BAC fold down light stands and the Manfrotto umbrella mounts.
I also use PocketWizard TT5 radio transceivers. This presents a problem with the umbrella mounts, as it places the speedlight unit very high in the softbox. This isn’t a major issue, but when you are trying to get a full spread of light out, and achieve a nice soft coverage… every little bit counts…
I discovered that PocketWizard produce an AC-7 radio interference (hard) shield (lovely idea by the way, very cool), and this places the Speedlight on axis with the umbrella column bringing a much more even spread. I am still testing to see if a dome diffuser works better with this, than the 14mm wide-spread cover.
I can now setup my softboxes on their own channel with the PocketWizard’s and adjust them independently with the AC-3 commander from on top of the camera. I get up to +/- 3ev points of adjustment in 1/3 stop adjustments. Plus the in camera flash global compensation adjustment.
An alternative to the light stand is a Monopod or a Tripod. This can give a slightly lower perspective with the Tripod, and you will need a Voice Activated Lightstand with the Monopod.
Please note that I could use a sync cable to achieve what the PocketWizards do, but my speedlights do not have a sync socket… which would mean an extension cord and socket (try OCFgear.com, they have some awesome cables), which still lifts the speedlight away from the umbrella spine. The combination of the AC-7 and the umbrella works out for me right now.
The Zen of Hardware
Ok. I know, it isn’t about hardware… It’s about vision, creativity, thinking on your feet, problem solving… Etc…..
But at some point you have to bolt stuff together in a semblance of some order. This has to be organised into a layout that places me (the photographer), my subject, the light and the shadow in the right place… against the plan, to achieve the ballpark of what you set out to do… to achieve the vision…
Don’t forget they may be other people involved in this process; the subject themselves may have a very clear view of how they want to be seen, the make up artist has to interpret your vision in their own particular way, and artistic director may have their view on what needs to be achieved, etc… these are all the ingredients for your particular recipe…
Of course, this is still part of the iterative process that takes place to develop the image into its final form (small steps), using the plan as the direction that you want to move in.
A fundamental thing here is to understand what your hardware can do, and what it can’t. Get to know your hardware, very well. Take pictures of anything you can lay your hands on, as often as you can. Explore the boundaries of your equipment, and constantly challenge your own view of the world…
Do your drills, setup and tear down your equipment, so that you can do it without thinking… This way you can concentrate on what you want to do, create an image…
Until next time, get out there, and create more images…
The anatomy of a shoot
How do I structure a shoot…?
This is one of those vague questions, but I will try to share with you how I approach a conclusion… successful or otherwise… (this will be a bumpy ride, but stick with it, we will get there…)
One framework I use to organise my thoughts is; what, so what, now what… Basically, what do I need to achieve, why does it matter (and to whom), and what should happen next…
Invariably, even if this is a personal assignment, these questions need to be answered and validated very early on before any real effort is put in… It gives the whole process a framework, and potentially encourages greater success than not using any sort of framework, or just winging it.
So, let’s illustrate this with an example, a local photography club want to encourage their members to keep pushing forward. They want to increase their enthusiasm. Each member has a unique set of desires and dreams… To keep them focussed a practical demonstration is arranged every meeting to focus on a particular style or genre of photography. These form the “what”
Some of these are occasionally merged into one session for expediency.
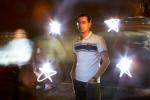
Amongst their many suggestions, members have requested night photography, capturing motion and light painting. Now we can merge these together…
I have been using my portrait style to demonstrate these practical sessions, and hopefully provide some encouragement…
For this upcoming session an idea started forming from these requirements, keeping in mind that it has to be simple to achieve, informative and engaging. This is the “so what” part, the target here is to illustrate as many genres as possible, attempting to perhaps influence, or expose, the members to different formative creative directions…
Motion and night photography say long exposures to me. Luckily where the club operates we are not short of some spectacular lighting and water displays. That works, an image right there…
There is also an opportunity here for light painting… Another image there…
(a lovely collection here: http://iniwoo.net/inspiration/photography-collection-of-light-paintings/)
(another lovely collection here: http://www.hightech-edge.com/slow-shutter-long-exposure-light-painting-astronomy-photography/5966/)
(and another here: http://www.visualswirl.com/inspiration/long-exposure-photography-31-breathtaking-examples/)
An aside here, we have just experienced GPP2012, the largest gathering of photographers in region. A great deal of fun for those obsessed with photography which wrapped with a shoot out between David Hobby, Martin Prihoda and Mr. Gregory Heisler… It’s no surprise who won. But the image that Martin attempted caught my attention.
(A lovely review of the shoot out by David Hobby here: http://www.strobist.blogspot.com/2012/03/shootout-in-desert-round-three.html)
I also have another mistress driving me, my desire to turn every image into a portrait… Why not try and keep the majority happy.
As you can see, the idea comes together from a large variety of disparate sources. As a result becomes a hybrid solution..,
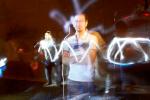
The opportunity here is to create a number of unique standalone images, which then also form the components of the main image.
So, now we have the “what”, and the “so what”, now comes the “now what”…
We have a 45 minute window in which to achieve all the above.
Key thing here is to get to the point and deliver the component images, then combine them to form the hybrid image. Plenty of audience participation, everyone is a winner…
So what are our component images:
- A night exposure
- A light painting
- A light painting and night exposure combined
Resulting in:
- An ambient light adjusted exposure and night light balanced image with light painting. (my little twist of turning this into a portrait)
Is this what eventually happened, well in a word no…
But…
We ended up with the merged image, which everyone collaborated in…. a result from an educational perspective. Hopefully, some of the members left with a slightly different view of the world…